Using Meeting Schedule Assistant
The main application window is fully resizeable and organised into eight key sections, each providing access to different features of Meeting Schedule Assistant. These sections help you navigate schedules, manage congregation data, configure settings, and stay up to date with news and reminders.
This guide walks through seven key areas of Meeting Schedule Assistant, from the Menu Bar to the Week Overview.
You can explore each area in more detail using the links below:
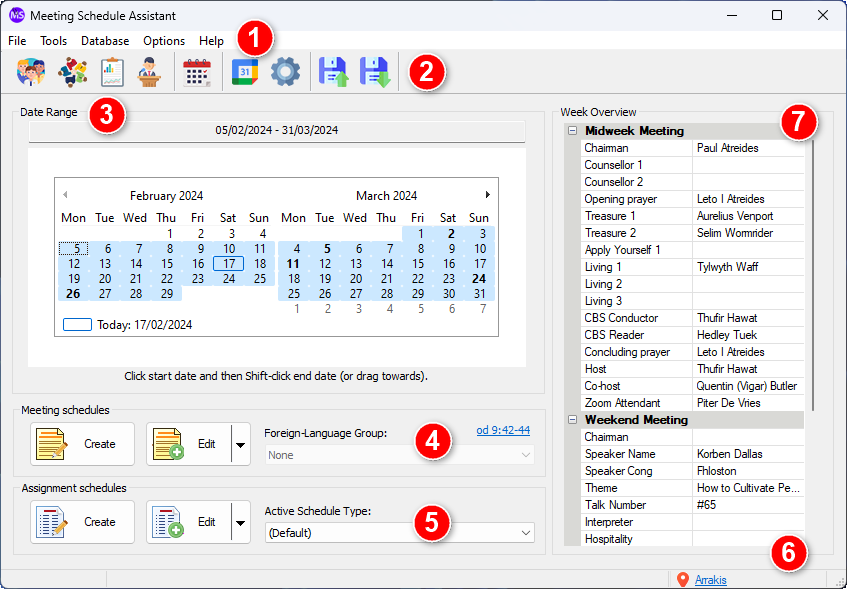
Figure 3. The main window showing the eight numbered sections.
Section 1 — Menu Bar
The Menu Bar provides access to all major features and settings in Meeting Schedule Assistant. It is organised into six menus—File, Tools, Database, Import, Options, and Help—each containing commands related to schedule management, data maintenance, configuration, and application updates.
ℹ️ Learn more: Menu Bar
Section 2 — Toolbar
The main toolbar provides quick access to commonly used features. Each button opens a dedicated tool or manager, allowing you to navigate efficiently without using the main menu.
ℹ️ Learn more: Toolbar
Section 3 — Calendar
The Calendar lets you select the date range used when creating new schedules. It displays up to four months at a time and supports flexible selection methods, including dragging, Shift‑clicking, and keyboard navigation. Special Events are highlighted when you hover over a date.
ℹ️ Learn more: Calendar
Section 4 — Meeting Schedules
This section provides quick access to creating and editing meeting schedules. You can open the Meeting Editor with a chosen date range, revisit recently used schedules, or work with Foreign‑Language Group settings when applicable.
ℹ️ Learn more: Meeting Schedules
Section 5 — Assignment Schedules
This section lets you create and edit schedules for roles such as sound, platform, and other congregation assignments. You can open the Assignments Editor, revisit recent schedules, or switch between schedule types to match your congregation’s needs.
ℹ️ Learn more: Assignment Schedules
Section 6 — Social Icons / News and Articles Feed
The Social Icons panel provides quick access to online resources, while the News & Articles Feed keeps you informed about updates, new releases, and workbook availability. Pinned items remain visible for convenience.
ℹ️ Learn more: Social Icons & News and Articles Feed
Section 7 — Week Overview
The Week Overview panel summarises the midweek and weekend meetings for the selected week, including any special events. It updates automatically as you move between weeks and can be expanded by resizing the window.
ℹ️ Learn more: Week Overview
Section 8 — Status Bar
The Status Bar appears at the bottom of the window and provides useful feedback as you work. It includes:
- Progress Bar — Displays progress when the application is performing longer operations.
- Information Pane — Shows contextual information such as file names or status messages.
- Congregation Name — Displays the name of the currently selected local congregation.
Resizing the Layout (Grippers)
Meeting Schedule Assistant includes two draggable grippers that let you resize key areas of the main window.
Vertical Gripper
Located between the Calendar and the News & Articles panel. Adjusts how much space each section occupies.
Horizontal Gripper
Located between the News & Articles panel and the Week Overview section. Adjusts the height of the Week Overview summary.
How to Use
- Move your mouse pointer over the gripper until it changes to a resize cursor (↔ or ↕).
- Hold down the left mouse button.
- Drag in the desired direction.
- Release the mouse button when the panels are sized the way you prefer.
Your layout adjustments are saved automatically and restored the next time you open the application.
Navigation
- Parent topic: Overview
- Previous topic: Quick Start - Getting Started
- Next topic: Using the 64 bit edition