General
Use the General tab to control how Meeting Schedule Assistant displays information, calculates schedule dates, and handles assignment columns in the Assignments Editor. All settings on this page are saved with each schedule.
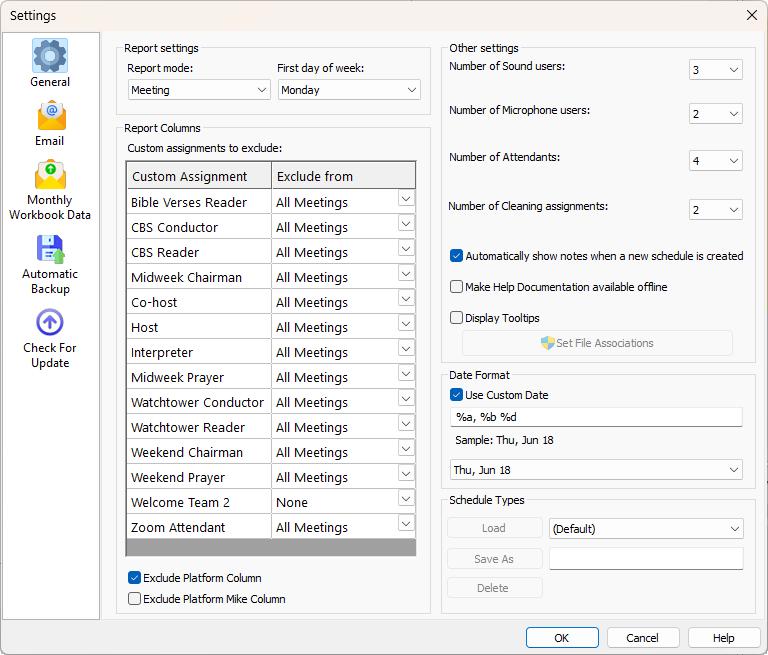
Figure 122. The Settings window showing the General tab.
💡 Remember to press OK to save your changes. They’ll remain in effect until you modify your application settings again.
How to Access
You can access this feature in two ways:
- Options → Settings
- Toolbar → Settings
The Settings window will open with the General tab selected by default.
Report Mode
Select how Meeting Schedule Assistant creates your reports.
- Meeting — Each row in the report represents a single meeting.
- Weekly — Each row in the report represents one week.
The default mode is Meeting.
First day of week
Choose which day your week begins on. The default is Monday.
The list of days comes from the application’s interface language you’ve selected. This ensures dates are calculated and displayed correctly on the schedules you create.
Date Format
These options control how dates are displayed on your reports.
- Use Custom Date — Enable custom formatting.
- Sample — Shows a live preview of the current format.
- User Defined — Enter a custom date format when Use Custom Date is enabled.
💡 Tip: See Custom Date Formats for the available formatting codes.
Report Columns
Use these options to control which assignment columns appear in the Assignments Editor and how they behave on your schedules.
If your congregation does not use the Platform or Platform Mike assignments, you can disable them using the checkboxes provided. These options are enabled by default.
All custom assignments you’ve added through the Custom Assignments Manager are also listed here. Each assignment has its own column on the schedules, and you can choose where that column should be excluded using the Exclude from dropdown:
- None — the assignment is included normally
- All Meetings — the assignment does not appear in the Assignments Editor
- Midweek Meeting — the assignment column is blank for midweek rows
- Weekend Meeting — the assignment column is blank for weekend rows
These settings help you tailor the Assignments Editor and your schedules to match the duties used in your congregation.
Number of users / assignments
Use these dropdown lists to choose how many Microphone, Sound, Attendant, and Cleaning assignments your congregation needs. Each assignment type appears as its own column in the Assignments Editor and on the created schedules.
Available ranges
|
Assignment Type |
Allowed Range |
|
Sound Users |
0–4 |
|
Microphone Users |
0–6 |
|
Attendants |
0–4 |
|
Cleaning Assignments |
0–2 |
Show Notes
Enable this option if you want the Notes row to appear by default on every new schedule you create. The Notes row is the final merged row across all columns on the schedule.
Offline Help Documentation
By default, Meeting Schedule Assistant uses online help documentation to keep the setup file size small.
This means you’ll need an internet connection to access the help system.
Enable this option if you prefer to have the help available offline.
When selected, the application downloads and installs the help file (in CHM format) from the website so it can be viewed without an internet connection.
💡 Did you know? The help documentation is also available as a GitHub Wiki, and a PDF version can be provided on request.
Display Tooltips
Tooltips provide brief context help when you hover over controls in the application. They are enabled by default, but you can turn them off using this option if you prefer not to see them.
Schedule Types
Schedule Types store their own copy of the program’s settings. They let you quickly customise how Meeting Schedule Assistant behaves for different assignment workflows. Each type is included when you perform a Backup or Restore of your settings.
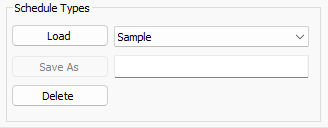
Figure 123. Example of the Schedule Types panel in Meeting Schedule Assistant.
|
Control |
Description |
|
Load |
Select a schedule type from the dropdown list (the default is always listed first) and click Load. The selected type becomes active, and all changes you make will apply to it. |
|
Save As |
Enter a description for the new schedule type before saving. Saving makes it active, and all subsequent changes are associated with it. Duplicate descriptions are not allowed. |
|
Delete |
Removes the currently selected schedule type. You cannot delete the default type. A confirmation prompt appears because this action cannot be undone. |
Set File Associations
Meeting Schedule Assistant is available in both 32‑bit and 64‑bit editions.
The software uses two file types:
|
File Type |
Description |
|
MWB |
Meeting Workbook Schedule — used by the Meeting Editor |
|
SRR |
Assignments Rota — used by the Assignments Editor |
If you switch to a different edition of the program, click Set File Associations to update which version opens these files.
💡 Remember to press OK to save your changes. They’ll remain in effect until you modify your application settings again.