Auto Assign Settings
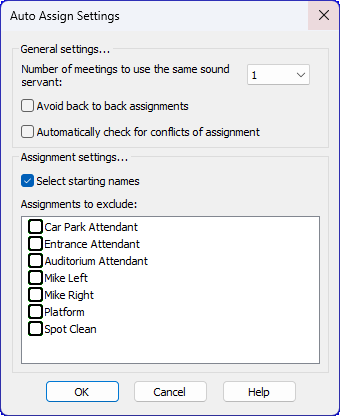
This window is displayed by selecting Settings from the Auto Assign menu on the Report Editor window. This allows you to change how the Automatic Assigning feature works. If you want it to include other rules, or would like additional options to determine how it performs the auto assign, then please contact me.


Number of meetings to use the same sound servant
Use the dropdown list to specify how many weeks (or meetings) to use the same sound servant. You can select from 1 to 10.
Avoid back to back assignments
Set this option and the program will try to avoid using the same brother two weeks (or meetings) back to back. Of course, this is dependant upon how many brothers you have available.
Automatically check for conflicts of assignment
Set this option to automatically highlight any assignment conflicts after the automatic assigning process has been completed.
 Learn more about the Auto Assign Settings window by looking through the rest of this help topic. Or, as an alternative, click on the item you are interested in on the screenshot above.
Select starting names
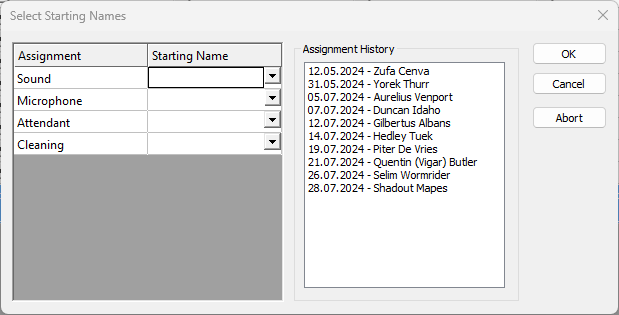
Auto Assign will display this pop-up window when this option is set.

You will see each assignment type listed on the left and dropdown lists for you to select from the available names. Should an assignment not have a name selected, Auto Assign will populate the assignments in the usual way.
This history is extracted from the Duty Assignment History file. By taking note of the history provided you will be able to select an appropriate starting name. This is a good way to avoid using the same brothers at the end of one schedule and the start of another.
Clicking on a name in the history will automatically select it in the dropdown list.
- OK
Populate the report using your chosen starting names. - Cancel
Populate the report without selecting starting names. - Abort
Abort the automatic assigning process and return to the Assignments Editor.
 The Platform Mike assignment uses the same set of names as for the Microphone assignment. This is why Platform Mike is never displayed in the list of assignment types for you to select a starting name.
When there is more than one assignment for each assignment type (i.e multiple roving microphone handlers; or more than one attendant) it is helpful to know that Auto Assign works from left to right, top to bottom. Therefore only one starting name needs to be selected for each assignment type.
Specific assignments on the schedule cannot first be populated manually, followed by Auto Assign. You must use the Select starting names option to select brothers of choice. Alternatively, after Auto Assign has completed its task, manually change names using the dropdown lists. That being said, please have a look at the Single Column feature if you need more control.
Assignments to exclude
This is a list of all the assignments (columns) that you have displayed on your schedule. Any assignment that you set as ticked will be excluded during the auto-assign process. This is useful for occasions when you would prefer to manually populate a column. This could be because the assignment concerned would contain names of brothers already there on a given line, which would normally result in a conflict of assignment warning. Sometimes, brothers are able to fill two or more roles on one meeting occasion depending on the duty, for example: Attendant and Hall Lock-up. Please not that these exclusion settings are reset when you edit the application Options or use the Custom Assignments Manager.
This window is displayed by clicking the Settings button on the Report dialogue. This allows you to change how the Automatic Assigning feature works.
 If you want it to include other rules, or would like additional options to determine how it performs the auto assign, then please contact me.
