Speakers
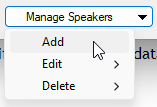
In the Congregation Manager window, you can add a speaker by clicking Add or edit an existing speaker by selecting them and clicking Edit (or by double-clicking their name). Alternatively, you can access the Manage Speakers option via the context menu in the Weekend Meeting Editor window.


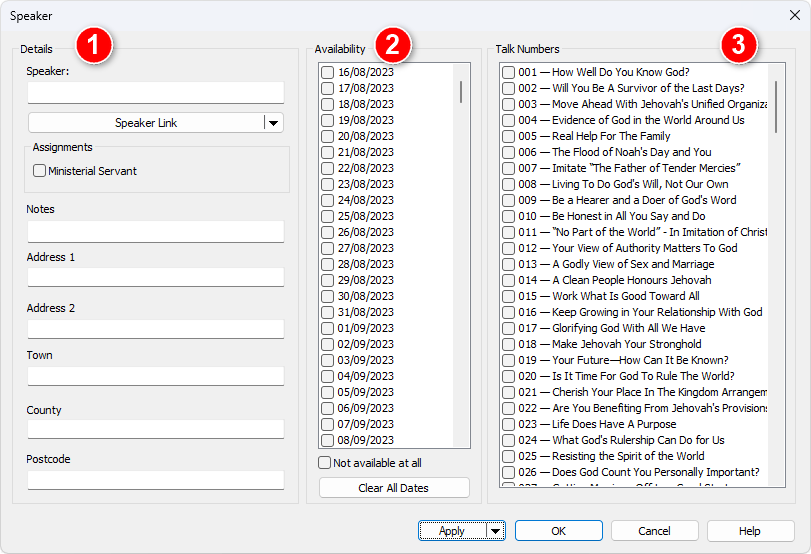
Use this window to maintain all of the information for a specific speaker in the database. The window is split into three parts:
- Section 1 is for the speaker contact details.
- Section 2 is for the speaker availability.
- Section 3 is for managing the speakers assigned talk numbers.
You must dismiss the window with OK in order that your changes get updated in the database!
 Or you can click the drop-down arrow and select Add... to automatically save the changes and begin adding another speaker.
Apply
Click Apply to save your changes to the database.
 Click the drop-down arrow and select Apply & Add to automatically save the changes and begin adding another speaker.
OK
Closes the window and prompts you to saves your changes to the database (if required).
Cancel
Closes the window without saving anything to the database (but you will be prompted if you have unsaved changes).
Section 1
Use the left hand side to maintain the contact details for the speaker. These include:
- Name
- Notes
- Memo 1 to 5
 The memo labels can be customized (as in this screen shot) using the application Options.
Ministerial Servant
Set the Ministerial Servant option if the brother is serving in this appointed capacity. His name will be displayed in the dropdown lists using the specified text colour. See the Options help topic for more information.
Section 2
You can set the availability for any speaker in any congregation. However, this feature is primarily designed to help you manage your own speakers during the year, as they are not always available for being assigned talks. Possible scenarios:
- Going on holiday.
- Extended period of sickness.
- Temporary inactivity
You can make note of their circumstances in the Congregations Database using this feature. This feature will make sure you avoid making talk assignments for brothers when they are not available. Simply check the dates as required.
Speakers who are not available on a given date will be displayed in the dropdown lists using the specified text colour. See the Options help topic for more information.
 The Not Available text colour will supersede the Ministerial Servant text colour.
Not available at all
You can also click Not available at all. This will make the speaker temporarily unavailable until you uncheck this setting.
Date Range
Sometimes, you may need to adjust dates across several weeks. To help with this, use the Date Range button. It opens a window where you can select the start and end dates, specifying when the someone is available or unavailable.
Reset
Marks all dates in the list as checked, indicating the speaker's full availability.
Section 3
Check all the talks that the speaker gives. Note that these checkboxes have three states:
- Checked
assigned public talk - Intermediate
favourite public talk - Unchecked
not assigned
Jump To
Use the Jump To edit box at the top to quickly find talks in the list. As you type, the list automatically highlights the first matching talk. You can use the spinner control to move to the next or previous match in the list.
Update List
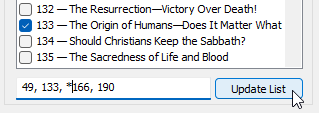
You can type the available talk numbers directly into the text box for convenience. Alternatively, you may copy and paste a comma-separated list into the text box, but make sure it adheres to the specified syntax rules.

Syntax Rules
- Enter talk numbers separated by commas.
- Talk numbers can be listed in any order.
- Mark favourite talk numbers with an asterisk (e.g., 1, 5, *10, 50).
- Spaces are optional, so formats like 1,2,3,4,5 are also acceptable.
Updating the List
The Update List button is enabled whenever changes are made in the text box.
- To synchronize the talk list, click Update List after editing the text.
Validation
- The program verifies all specified talk numbers to ensure they are valid and present in the database.
- If invalid entries are detected (e.g., 1,,5 or 1, xyz), an error message will appear to inform you of the issue.
View Menu —Report Viewer
The Report Viewer is a powerful tool that allows you to select from a variety of reports for printing or saving as PDF. Here’s what you can do with it:
- Select Reports: When you open the Report Viewer, you’ll find a list of available reports. Choose the one that suits your needs — whether it’s congregation statistics, public talk summaries, or other relevant information.
- Custom Templates: In version 24.0.0, several custom templates were moved from the Meeting Editor to the Report Viewer. These templates provide flexibility in formatting and content. You can tailor them to your specific requirements.
- Field Service Group Template: Additionally, a brand-new template was added specifically for displaying Field Service Group information. This template ensures that group details are presented in a visually appealing report format.
- Field Ministry Assignments Template: Another new template allows you to display Field Ministry arrangements in a clear, visually appealing report format.
Feel free to explore the reports and templates available in the Report Viewer.
