Manage Custom Reports
|
|

The Custom Script Editor allows you to maintain a selection of custom report scripts. Custom report script files are required to be able to produce your own custom schedules. You can add, modify, copy and delete the scripts as required.
 It is recommended that you also view the supplied sample scripts. Using the sample scripts and reading all the help documentation concerning custom reports, you should be able to create your own scripts with relevant ease.
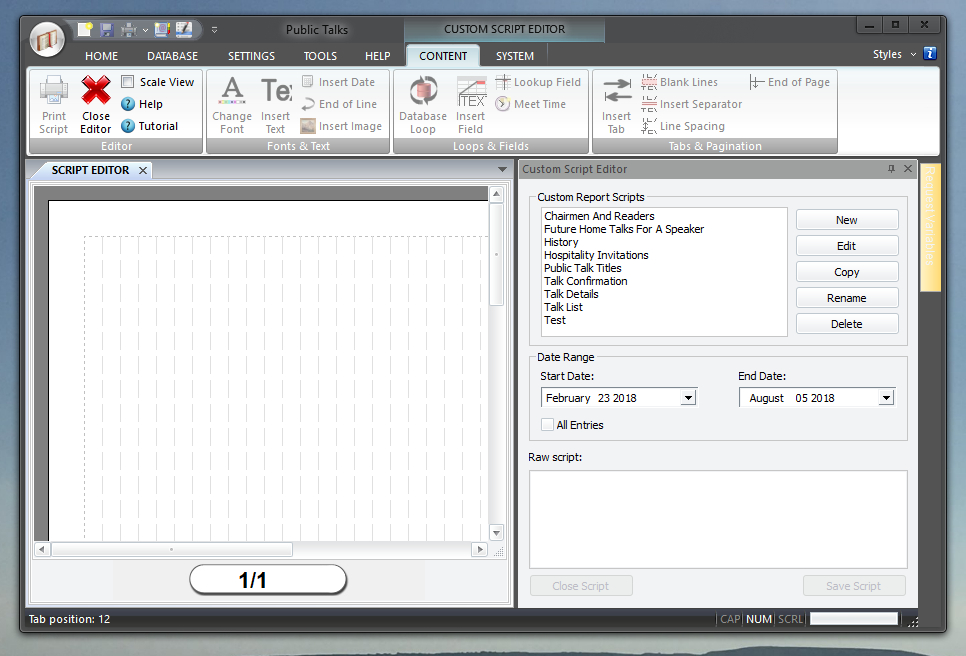
To learn more about the features of the editor, glance down the table below or highlight the control you are interested in by clicking on the screenshot above.
Pressing Close Editor will shut down the editor. The two extra ribbon panels CONTENT and SYSTEM will no longer be visible.
The setting of the Scale View option determines how the script editor initially behaves. When this setting is on the view of the page in the editor is scaled to fit the width of the page. The height takes on the same scale and thus may be shorter than the window. In other words, the editor's view shows the whole page at once.
When this setting is off then the editor will show the view at 1:1. It will be necessary for you to scroll left and right in order to view the whole width of the page.
The setting gets stored between instances of using the editor.
Pressing the New button allows you to create a new script file. To begin with, it brings up an edit box for you to specify the name for the script. You will not be allowed to duplicate an existing script in the list.
If the new script name is valid, it then activates the script editor. Using the editor you can create the new script. Click on the link for more detailed information.
Pressing the Edit button allows you to alter an existing script file. Alternatively you can double click the script name in the list box.
It then activates the script editor. Using the editor you can alter the script. Click on the link for more detailed information.
Pressing the Copy button in similar to pressing the New button. The only difference is that it duplicates the contents of the currently selected script into the new script for you. Otherwise, it behaves exactly as for pressing the New button.
Pressing the Rename button allows you to change the name of the custom report script. You can also use CTRL + R.
Pressing the Delete button (or the Delete key) allows you to delete the selected script file from your list of scripts. You are asked for confirmation before the script is deleted because it cannot be retrieved.
The start date is used in conjunction with the end date. This limits how much database information is available for use in the script editor.
For example, if you are looking at a Home Talks schedule, or a Watchtower and Readers schedule, you are likely only interested with database information from within a certain date range.
Use these options to set that date range. Please note that the date range only applies to these table sin the database:
- Away Talks
- Congregations
- Home Talks
- Public Talk Titles
 It has no effect on any other table, even ones you may have added. Also, you can override the date range limit inside the script itself.
These options will be disabled if the All Entries option is on. See below for details.
The date range gets stored between instances of using the editor.
The All Entries setting will override any date range currently specified. It ensures that all database information will be available inside the script editor.
The setting gets stored between instances of using the editor.

